Media Manager
Chapter 4 — Media Manager. Command every product's featured image, gallery, and metadata from one visual workspace.
Plugin version: v2.1.4
The Media Manager is a different way to look at your catalog. Instead of one row per product like the Bulk Editor, it shows one card per product, with the featured image and gallery thumbnails laid out visually. It is for when the job is about images, not text fields.
Ever spent an afternoon clicking through 80 products to add alt text for SEO, or rearranged a gallery one product at a time to put the better photo first, or swapped last season's hero shots for this season's? That is exactly this tab. Same products as the Bulk Editor, same database, same data — shown through an image-first lens.
4.1 Opening the Media Manager
From the WooCommerce admin sidebar, go to WooCommerce → Bossy Bulk Editor, then click the Media Manager tab in the top navigation.
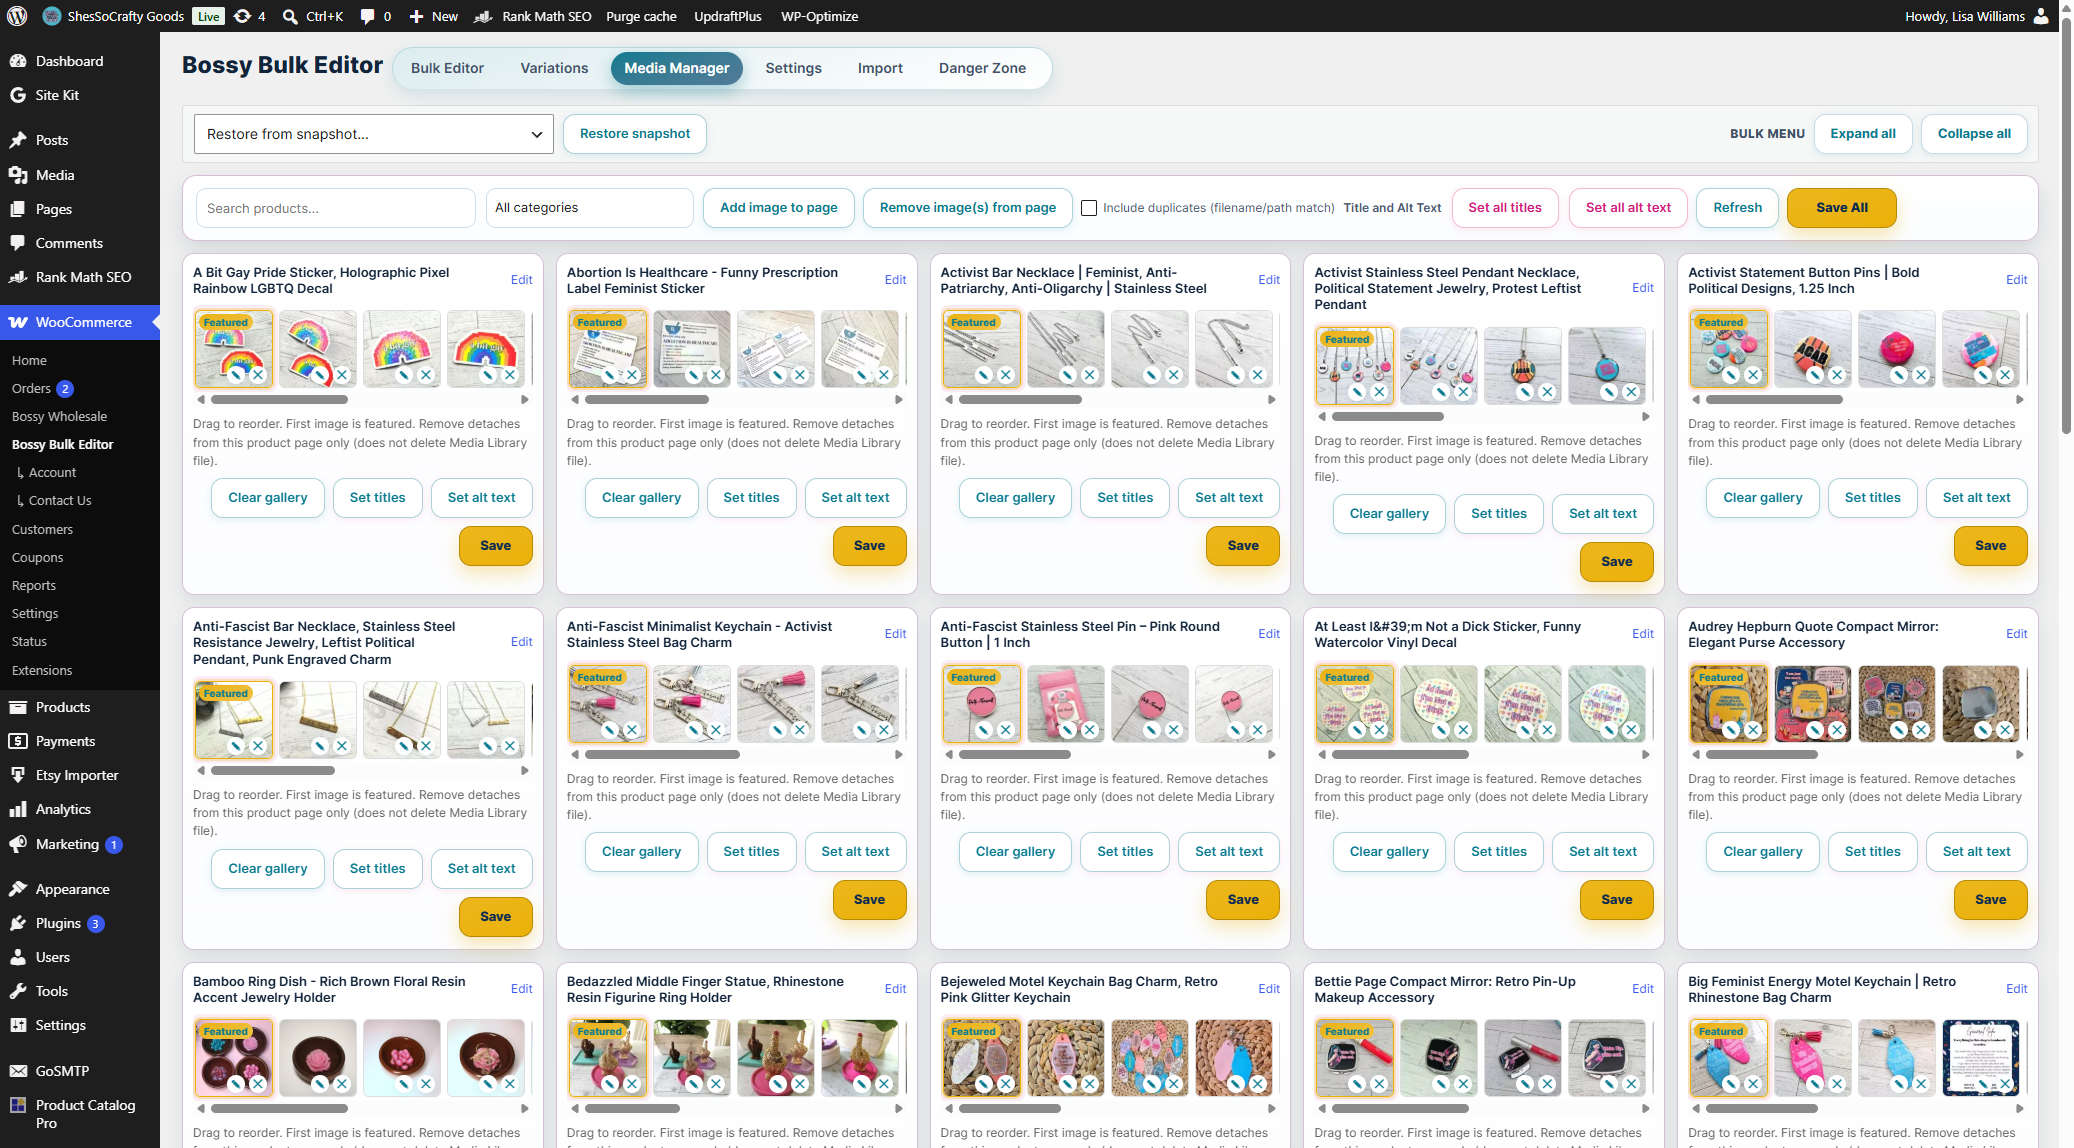
The first load fetches your product list and renders a card per product on the current page. Load time scales with your catalog size and images per product — that is normal. Once loaded, everything is fast.
4.2 The toolbar
Across the top of the Media Manager sits the toolbar. Left to right:
Search products. Matches product title and tags — the same search behavior as the Bulk Editor. It does not search description text, so a product with an unrelated word buried in its description will not clutter your results. Type a name, partial name, or tag to filter the cards.
All categories filter. Dropdown of every product category. Pick one to narrow the cards to that category.
Add image to page. The bulk gesture you reach for most. Appends one image to every product on the current page in a single click — a seasonal hero, a watermarked sale banner, a brand badge — without clicking into each product. Changes queue as unsaved edits; you still click Save All to commit.
Remove image(s) from page. The counterpart to Add. Removes a chosen image from every product's gallery on the current page at once — the clean way to pull a badge or seasonal banner back off a batch when the promotion ends. Like Add, it queues as an unsaved edit until you Save All.
Include duplicates (filename/path match). A checkbox that changes how removal matches images. Off, removal targets the exact media ID. On, it also sweeps likely duplicates on the page by matching image filename/path — useful when the same photo was uploaded more than once and has different attachment IDs.
Title and Alt Text group. Two buttons that bulk-set metadata across the current page:
- Set all titles — sets each image's Media Library title to the product name + a number (1, 2, 3…) in left-to-right order. A product called "Resin Ring" with three gallery images gets titles "Resin Ring 1", "Resin Ring 2", "Resin Ring 3". This writes the Media Library title — which also fills the Title field in each image's popout (see 4.3) — not alt text and not filenames. It only touches images used on this product alone, skipping any image shared with other products or used elsewhere on your site.
- Set all alt text — sets alt text from the first paragraph of the product's long description. If the long description is empty, it falls back to the short description. If both are empty, it uses the same numbered title pattern as Set all titles. Multiple images on one product get
(1),(2)suffixes. Product-exclusive images only.
Refresh. Reloads the page from the database. Handy after editing products in another tab.
Save All. Commits every pending change across all visible cards. The big one.
Status indicator. Next to Save All. Shows progress and success messages during saves. A banner at the top of the screen repeats that message — green when the save landed, red when it failed — and stays up long enough to read. The same banner is on the Bulk Editor and the Variations tab.
4.3 The product card
Each product on the page gets its own card, in three parts.
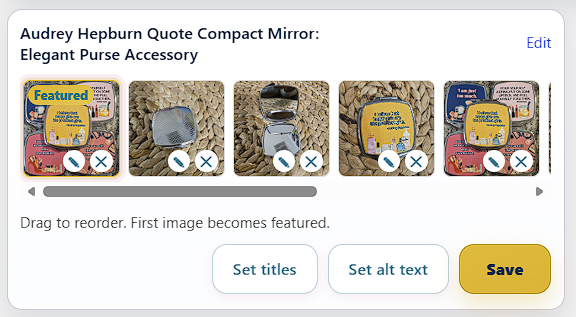
Featured image (main thumbnail)
The large image on the left of the card — the product's featured image, the one WooCommerce uses on shop pages, search results, and as the default product-page image. Click to swap it via the WordPress media library; click the X overlay to remove it entirely.
Gallery thumbnails
A horizontal strip of smaller images to the right of the featured image — the product's gallery, the extra photos shoppers see beneath the main image. Each thumbnail supports:
- Reorder — drag thumbnails to change gallery order. The order in the card is the order shoppers see on the storefront.
- Remove — click the X to remove a thumbnail from the gallery (the file stays in your media library; only the gallery link is removed).
- Add — the + tile at the end opens the media library to pick more images.
Image popout: Title, Alt text, Caption
Click an image to open its popout. You get three editable fields — Title, Alt text, and Caption — to view, edit, and save per image. Saving writes straight to the attachment's metadata and syncs back to the thumbnail strip, so a new title shows immediately. This is where you do per-image work when a bulk auto-fill is close but you want to write something custom.
Per-card buttons: Set titles, Set alt text, Clear gallery, Save
Each card carries its own row of buttons beneath the gallery. Set titles and Set alt text are the single-product versions of the toolbar's page-wide actions — same numbering and auto-fill logic, but only on this product's images, so you can fix one product without touching the rest of the page. Clear gallery removes every gallery image from this product in one click (the featured image is left in place, and it is snapshot-backed, so undo has you covered). Save commits just that card.
4.4 Saving your work
Two ways to save Media Manager edits.
Per-card save
Each card's own Save button (next to that card's Set titles / Set alt text). Use it when you have finished one product and want to commit it before moving on, without saving the whole page.
Save All
The big Save All button in the toolbar commits every pending change across every card currently on the page.
4.5 The pagination row
Beneath the cards is a pagination row for moving through your catalog page by page. The Media Manager loads cards in batches to stay responsive — rendering 200 product cards with every gallery image at once would be brutal on your browser.
To work a full catalog systematically: filter narrow, edit, save, paginate — then repeat.
4.6 Common workflows
Workflow 1: Alt text for every product in a category (SEO sprint)
- Open the Media Manager tab.
- Filter the category dropdown to your target category.
- Confirm the rendered cards are the products you expected.
- Click Set all alt text in the toolbar.
- Bossy fills alt text from each product's long description (short as fallback) onto every image on the page.
- Click Save All and wait for the success indicator.
- Paginate if the category has more products, then repeat steps 4–6.
Workflow 2: Replacing seasonal hero images across a category
- Upload your new hero images to the WordPress media library first (Media → Add New).
- Open the Media Manager and filter to the season-appropriate category.
- On each card, click the featured image to swap in the new hero.
- Click Save All after every page.
- If the new heroes also belong in the gallery, drag them into each card's gallery row.
Workflow 3: Adding — then later removing — a brand badge across a page
- Upload the badge image to your media library.
- Open the Media Manager and filter or paginate to the products that need the badge.
- Click Add image to page and pick the badge.
- The badge is appended to every product's gallery on this page (queued, not saved yet).
- Click Save All, then paginate and repeat.
- When the promotion ends, come back, click Remove image(s) from page, pick the badge, and Save All to pull it back off — one click per page instead of one per product.
Workflow 4: Cleaning up image metadata after an import
- Just imported products from a CSV (Chapter 5)? The imported images probably carry ugly auto-generated titles like "img_2843_final_REAL_v2.jpg".
- Open the Media Manager and filter to one category at a time so you can verify results.
- Click Set all titles to rename every image to a clean product-name pattern.
- Click Set all alt text to populate alt text from your descriptions.
- Save All, then move to the next category.
4.7 What the Media Manager is NOT for
A few things people try here that belong elsewhere:
Editing prices, stock, or descriptions. Use the Bulk Editor tab. The Media Manager is for visual and metadata changes only.
Variation images. Variation-level image assignment lives in the Bulk Editor variation panel (Chapter 3) and the Variations tab (Chapter 13). The Media Manager works at the parent-product level — featured image and the parent gallery, not per-variation galleries.
Uploading new images. The Media Manager picks from images already in your WordPress media library. Upload via Media → Add New first, then come back to attach them.
Editing image files themselves. Cropping, resizing, color — that is the WordPress image editor, reached by clicking into the image in the media library.
4.8 Things that catch people off guard
"Set all titles" and "Set all alt text" skip shared images on purpose. If an image is used on multiple products or elsewhere on your site, Bossy will not touch its title or alt text in a bulk run — that would change how it appears everywhere else it lives. Rename a shared image manually in the WordPress media library.
"Add image to page" and "Remove image(s) from page" work on the visible page only. They act on the cards currently on screen, not your whole filtered catalog. Adjust your per-page setting or run once per page.
Drag-to-reorder needs a save. Reordering gallery thumbnails inside a card does not auto-save. Save All (or per-card save) commits the new order.
Refresh throws away pending edits. Refresh reloads from the database and discards unsaved edits on screen. Use it deliberately, not as a panic button.
Chapter 4 recap
- The Media Manager is a Pro-only tab that shows your catalog as image-centric cards instead of text rows.
- Toolbar bulk gestures: Add image to page, Remove image(s) from page (with an "Include duplicates" filename/path option), Set all titles, and Set all alt text.
- Both "Set" buttons act only on product-exclusive images — they never touch images shared across multiple products.
- Each card edits a product's featured image, gallery, and per-image metadata (Title, Alt text, Caption), and can Clear gallery in one click — all snapshot-backed.
- Save All commits all pending changes on the current page. Paginate after saving, not before.
- Use this tab for image and metadata work. Use the Bulk Editor for everything else.