Customer Personalization
Customer personalization lets shoppers type a custom text input into a product page — a name to engrave on a keychain, a date for a wedding gift, a recipient name for a card, a custom message for a handmade journal. That text travels with the order from cart to fulfillment so you know what to put on the physical product.
For makers and shops selling personalized goods, this is one of the highest-value features in the entire plugin. A keychain that says "Mom" is worth maybe $8. A keychain that says "Mom" with your daughter's actual birthdate and the name "Hazel" on it is worth $25 and impossible to find elsewhere. Personalization is how handmade competes on price by competing on uniqueness instead.
How Bossy implements personalization (the important compatibility story):
Bossy attaches personalization data to WooCommerce line items using WooCommerce's standard cart and order hooks. This is the same mechanism WooCommerce itself uses for variation attributes, gift wrap options, and add-ons from other plugins.
The standard WooCommerce hooks Bossy uses:
woocommerce_before_add_to_cart_button— renders the personalization input field on the product pagewoocommerce_add_to_cart_validation— validates required fields before allowing Add to Cartwoocommerce_add_cart_item_data— stores the customer's input as cart item datawoocommerce_get_item_data— shows the personalization value in the cart and checkout line item displaywoocommerce_checkout_create_order_line_item— persists the personalization to order item meta when checkout completes
The legacy fallback hook (for non-standard checkouts):
woocommerce_add_order_item_meta— a legacy path Bossy hooks into automatically when Pro is active. If a checkout plugin skips or replaceswoocommerce_checkout_create_order_line_item, this fallback catches the order item creation and writes the personalization value to order item meta anyway. Customers do not need to configure or enable this — it runs automatically.
Verified compatibility: Bossy personalization has been tested and confirmed working with the standard WooCommerce cart and checkout — including in production on bossyplugins.com, where personalized item orders have been placed, received, and fulfilled successfully.
Other cart and checkout plugins: because Bossy hooks into both the modern and legacy WooCommerce order item creation paths, it should work with any cart, checkout, packing slip, fulfillment, or accounting plugin that uses either path. Most plugins on the WooCommerce ecosystem use one or the other. We have not run targeted tests against every cart plugin on the market.
A checkout plugin can still break or miss Bossy personalization if it does any of the following:
- Bypasses the product-page Add to Cart UI entirely (some "instant checkout" or "buy now" buttons skip the product page, meaning the input field never renders for the customer to fill in)
- Bypasses
woocommerce_add_cart_item_datawhen adding items to the cart (input value is never captured) - Creates orders without firing EITHER
woocommerce_checkout_create_order_line_itemORwoocommerce_add_order_item_meta(extremely unusual — would mean the checkout is not using standard WooCommerce order creation at all) - Replaces line-item rendering with a custom data path that does not respect WooCommerce's standard cart/order item display hooks (input is captured and saved but not visible in cart/checkout/order displays)
9.1 The personalization fields
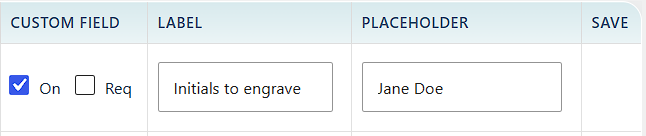
Personalization is controlled by four fields per product, edited from the Bulk Editor grid. They are not visible by default — turn them on through the column picker (Chapter 2.4).
Custom Field — On checkbox. A checkbox column. Checked means this product accepts a personalization input from the customer on the storefront. Unchecked means it does not — the product behaves like any normal WooCommerce product with no personalization field shown.
Custom Field — Req checkbox. Sits in the same Custom Field column, right next to On. Checked means the personalization input is REQUIRED — the customer cannot add this product to cart unless they fill in the personalization field. Unchecked means the input is optional — they can leave it blank and still buy the product. Discussed in detail in section 9.4.
Label. The text shown above the input field on the product page. This is what tells the shopper what they're providing. Examples: "Name to engrave", "Date for engraving", "Recipient name", "Custom message". Keep it short and specific — vague labels like "Customization" get vague inputs from confused shoppers.
Placeholder. The grayed-out hint text shown INSIDE the empty input box. It disappears as soon as the customer starts typing. Use this to show a format example: if the Label says "Date for engraving", the Placeholder might be "e.g. 06/15/2024" or "Month Day, Year". Set expectations and you get cleaner input data.
9.2 Enabling personalization on a product
- Open the Bulk Editor.
- Click the column picker (the columns icon in the sheet toolbar).
- Turn on the Custom Field column. Label and Placeholder turn on with it.
- In the product row you want to personalize, check the On box in the Custom Field column.
- If the personalization input should be MANDATORY before checkout, also check the Req box. For optional input, leave Req unchecked.
- In the same row, click into the Label cell and type the prompt the customer will see (e.g., "Name to engrave").
- Click into the Placeholder cell and type your hint text (e.g., "First name only, 12 characters max").
- Click Save on that row, or Save All Changes in the toolbar.
- Visit that product on the storefront to verify the input field appears with the label and placeholder you set.
9.3 What the customer sees on the storefront
On a product page with personalization enabled, the customer sees:
- The product title, price, gallery, and description as normal
- A text input field with your Label as its prompt
- Your Placeholder text inside the empty field as a hint
- The character limit (set via Settings → Custom Input Field → Max input characters, see Chapter 6.5)
- The input field width as a percentage of the product area (Settings → Custom Input Field → Input field width)
- The standard Add to Cart button below the input
When the customer types their text and clicks Add to Cart, the text is captured and attached to that line item in their cart.
9.4 Required vs optional inputs
Whether personalization is required (customer cannot complete checkout without filling it in) or optional (customer can leave it blank and still buy the product) is controlled per product by the Req checkbox in the Custom Field column of the Bulk Editor grid.
Bossy enforces required fields in two layers. The first is a JavaScript guard injected on the product page: while the required input field is empty, the Add to Cart button is visually disabled (opacity reduced, pointer events blocked) and re-enables as soon as the shopper starts typing. The second is server-side validation via WooCommerce's woocommerce_add_to_cart_validation filter — if a customer bypasses the JS guard (direct form submission, accessibility tools, etc.), the server rejects the add-to-cart attempt with an error message and the cart is not modified.
Setting the required state:
- In the Bulk Editor, open the column picker and enable the Custom Field column.
- For products that need required personalization, check both On AND Req in the Custom Field column.
- For products with optional personalization, check On only and leave Req unchecked.
- Save the row.
9.5 Sizing the personalization input
The Settings tab (Chapter 6) has two sliders that control the personalization input universally across all products:
- Max input characters — the character limit on the input box. Lower for short text like a name (20-30 chars), higher for longer messages (100+).
- Input field width — how wide the box appears on the product page, as a percentage. Wider feels more inviting for longer text; narrower feels like a name-only field.
These sliders apply to EVERY product with personalization enabled. If you sell both name-only items (where 25 characters is plenty) and custom message items (where customers need 150), pick a max that accommodates the bigger use case and rely on your Label and Placeholder to set expectations for shorter products.
9.6 Where the personalization text shows up after purchase
When a customer buys a product with personalization filled in, the text follows the order through every stage:
- Cart page — visible as line item metadata under the product name
- Checkout page — also visible as line item metadata
- Order confirmation email to customer — appears in their order summary
- Order notification email to you (the shop owner) — appears in your new-order alert
- Order detail page in WooCommerce admin — visible when you open the order to fulfill it
- Packing slip / invoice plugins — most respect WooCommerce line item meta and will print personalization on packing slips
9.7 Common workflows
Workflow: Adding personalization to all keychain products
- Filter the Bulk Editor to your keychain category.
- In the column picker, enable the Custom Field column.
- For each keychain row, check the Custom Field checkbox, type "Name to engrave" in Label, and "First name, max 12 characters" in Placeholder.
- Save All Changes.
- Confirm on the storefront that each keychain shows the input.
Workflow: Wedding/event products with date input
- Create or filter to your event-themed products (wedding gifts, anniversary gifts, etc.).
- Enable Custom Field on each.
- Label: "Event date" — Placeholder: "e.g. June 15, 2025"
- Save.
9.8 Things that catch people off guard
Personalization data is stored as WooCommerce order line item meta. This is why it works with any plugin that respects order item meta (packing slips, fulfillment integrations, accounting tools, reporting plugins). It does not break or change anything else about how WooCommerce treats the order. This compatibility is by design, not by accident.
Personalized line items are technically the same product as non-personalized ones. Stock counts, SKUs, and inventory all behave normally — adding personalization does not create a separate variant for each customer's input. WooCommerce just attaches the customer text as metadata to that line.
The free plugin shows the Custom Field, Label, and Placeholder columns in the column picker, but they display an upgrade message instead of editable controls. Saving or using personalization data requires Pro.
Switching a product back to non-personalized does NOT remove personalization from past orders. Past orders preserve the customer's input forever as historical line item meta. Turning the Custom Field off on a product only affects FUTURE orders for that product.
Chapter 9 recap
- Customer personalization is a Pro feature. Four fields per product: On checkbox, Req checkbox, Label, Placeholder — editable from the Bulk Editor grid. The column picker has three toggles (Custom Field, Label, Placeholder); On and Req share the Custom Field column. Enabling Custom Field auto-enables Label and Placeholder.
- On enables personalization. Req makes the input mandatory — enforced by a JS frontend guard (button disables while field is empty) plus server-side
woocommerce_add_to_cart_validation. - Settings tab sliders (Chapter 6.5) control max characters and input field width universally for all personalized products.
- Bossy hooks into 5 standard WooCommerce hooks plus the legacy
woocommerce_add_order_item_metafallback to cover both modern and legacy checkout patterns. Verified in production on standard WooCommerce checkout. - Customer input travels through cart, checkout, order emails, and admin order pages as WooCommerce line item meta.
- Use admin order pages as your source of truth when fulfilling personalized orders. Transcribing from emails risks errors.
- Turning personalization off on a product affects future orders only. Past order data is preserved.