CSV Import
Chapter 5 — CSV Import. Bring products in at scale with template, auto-map, or manual mapping flows.
Plugin version: v2.1.4
Bossy's CSV Import is a full WooCommerce catalog importer — not just an Etsy migration tool. It handles any CSV from any source, and ships with its own template that covers every WooCommerce product field plus every Bossy-specific field (variation galleries, personalization). Whether you are building a catalog from scratch, migrating from Etsy, migrating from Shopify, importing a supplier feed, or restoring from a backup, the same three-step workflow handles it.
Three ways to use the Bossy importer — pick the one that fits your situation:
- The Bossy template path (recommended for new catalogs). Download the Bossy template CSV. Build your catalog in Excel or Google Sheets using the pre-labeled columns. Import. No column mapping required — the template columns match exactly what Bossy expects. This is the cleanest path for new WooCommerce stores, clean rebuilds, and anyone starting from Excel or Google Sheets rather than another platform.
- The platform migration path. Export your data from Etsy or Shopify. Upload the export to Bossy. Bossy auto-detects the source (Etsy, Shopify, or Generic) and shows it in the Source profile bar. Click Auto-map detected to apply the mapping for whatever it recognized, or Auto-map Etsy for Etsy files specifically. Bossy translates the platform-specific column names to WooCommerce fields automatically. Covered in section 5.7.
- The bring-your-own-CSV path. Upload any CSV — supplier feed, ERP export, developer handoff, legacy system export, whatever. Map columns manually using the mapping table. Save the mapping as a preset for future runs. Covered in section 5.3.
This chapter covers all three paths, the auto-map presets, SKU strategies, image handling, re-import behavior, and the full variation import workflow.
5.1 The 3-step import flow at a glance
Bossy's import is structured as three cards on a single screen. You progress top to bottom:
- Step 1: Upload CSV — pick the file, click Read CSV, Bossy parses it.
- Step 2: Column mapping — tell Bossy which CSV column matches which WooCommerce field. Use auto-map presets or do it manually.
- Step 3: Preview rows — see what is about to be imported. Adjust mapping if anything looks wrong, then click Run Import.
After import runs, an Import results card appears with a summary of what happened, including any rows that failed and why.
5.2 Step 1: Upload the CSV
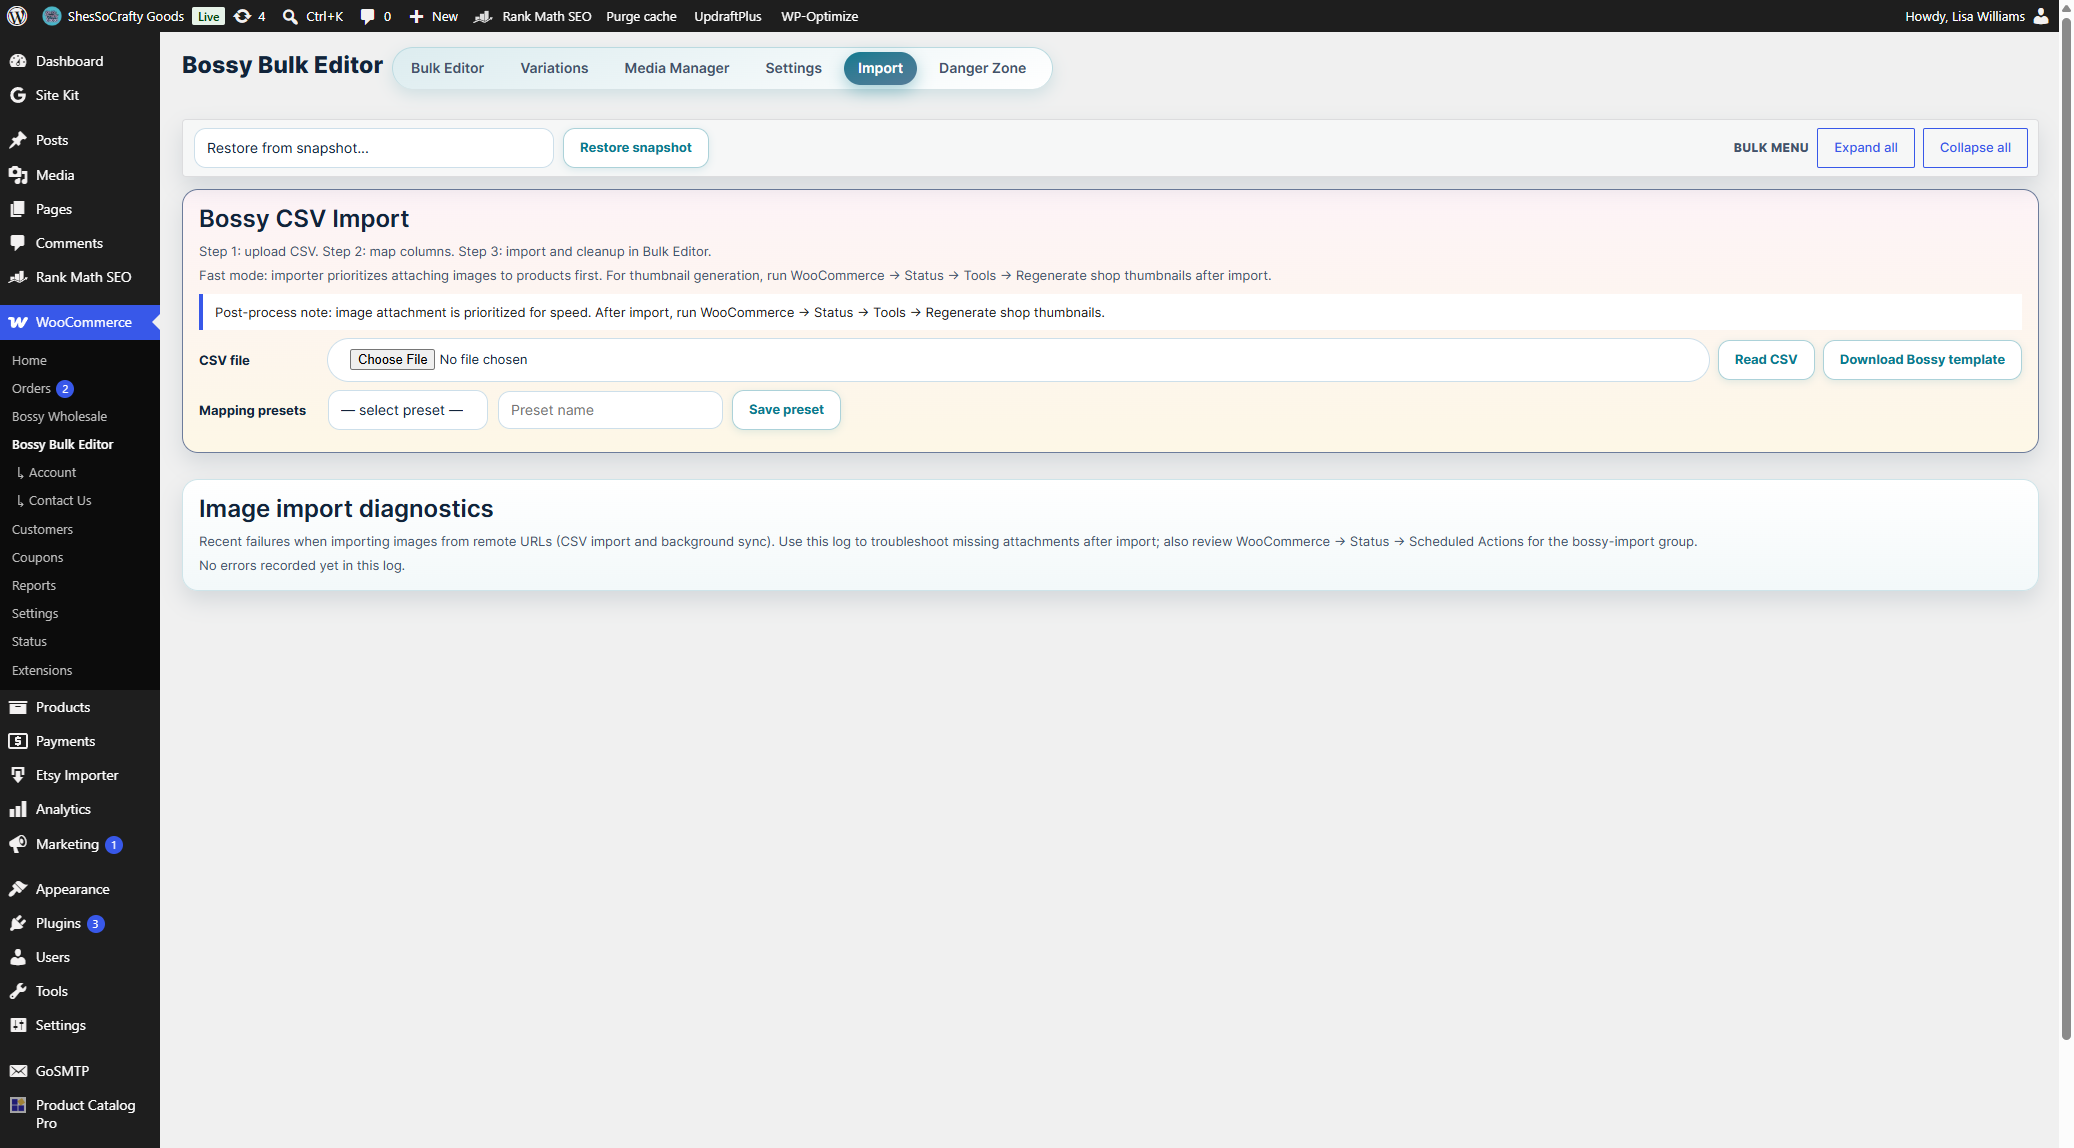
At the top of the Import tab is a card labeled Bossy CSV Import. Three controls:
CSV file input. A file picker accepting .csv files only.
Read CSV button. Click this after selecting a file. Bossy parses the file in your browser, detects column names, and reveals the Step 2 mapping card.
Download Bossy template button. Downloads the Bossy catalog template CSV. Covered in full in section 5.2.1 below — if you are building a new catalog from scratch, read that section first.
Below the file controls is the Mapping presets row:
- Preset dropdown — pick a previously-saved mapping preset to skip Step 2.
- Preset name field + Save preset button — after you finish a mapping you want to reuse, give it a name and save it. Next time you import a similar CSV, just load the preset.
5.2.1 The Bossy template — building a catalog from scratch
The Bossy template is a 58-column CSV with pre-labeled columns and three working example rows (one simple product, one variable parent, one variation child). Download it, open it in Excel or Google Sheets, add your products using the examples as a guide, and import. No manual column mapping required — the template columns match exactly what Bossy expects.
Why the template is the cleanest import path:
- Column names are pre-matched to Bossy destinations — Step 2 mapping is automatic
- Includes Bossy-specific columns that no other importer template covers:
bossy_var_gallery(variation gallery images) and the full personalization field set (bossy_custom_enabled,bossy_custom_required,bossy_custom_label,bossy_custom_placeholder) - Three example rows teach the simple / variable / variation row relationship so you understand the format before you start building
- Pipe-delimited image URLs (
image1.jpg|image2.jpg|image3.jpg) for multi-image galleries in a single cell
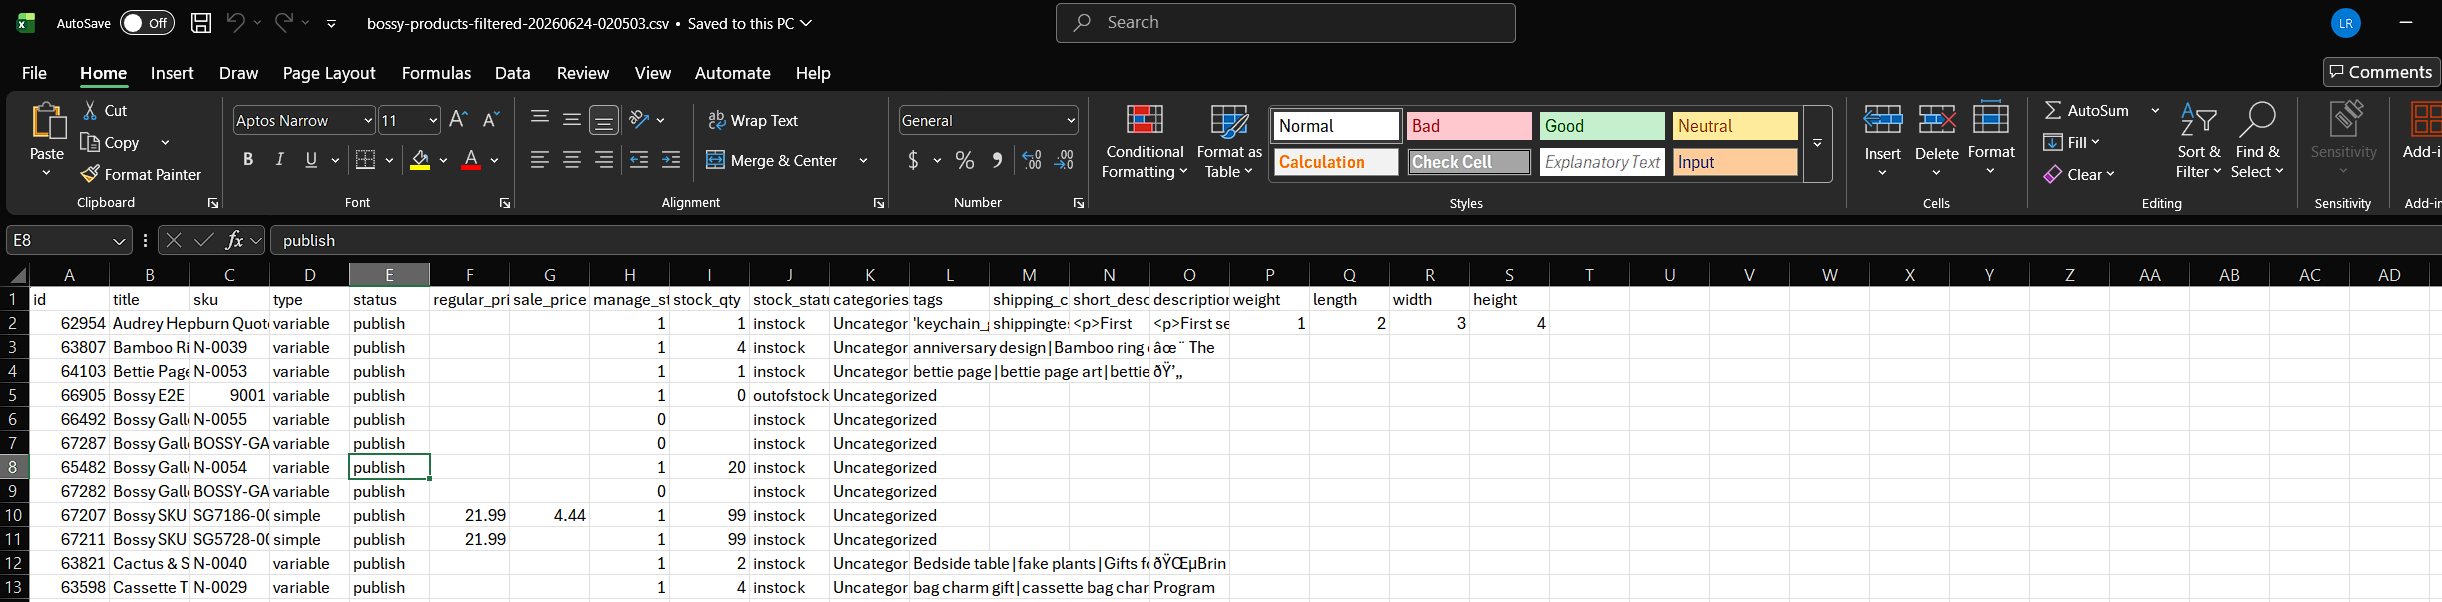
The 58 template columns, grouped by category:
Product identity (columns 1-9): id, type, sku, parent_sku, name, slug, status, featured, catalog_visibility
Pricing (columns 10-13): regular_price, sale_price, date_on_sale_from, date_on_sale_to
Tax (columns 14-15): tax_status, tax_class
Inventory (columns 16-21): manage_stock, stock_qty, stock_status, backorders, low_stock_amount, sold_individually
Shipping (columns 22-26): shipping_class, weight, length, width, height
Content (columns 27-32): reviews_allowed, categories, tags, description, short_description, purchase_note
Downloadable products (columns 33-37): virtual, downloadable, downloads, download_limit, download_expiry
External/grouped products (columns 38-42): external_url, button_text, upsells, cross_sells, grouped_products
Images (columns 43-44): image_url (pipe-delimited gallery, first image becomes featured), variation_image_url (featured image for this specific variation)
Variation attributes — per-variation (columns 45-48): var_attr_1_name, var_attr_1_value, var_attr_2_name, var_attr_2_value (the specific attribute selection for this variation row, e.g., Color=Blue)
Product attributes — parent level (columns 49-53): attr_1_name, attr_1_values, attr_1_visible, attr_1_global, attr_1_default (the full attribute definition on the parent product, e.g., Color with all values Pink|Teal|Blue)
Bossy-specific extensions (columns 54-58):
bossy_var_gallery— pipe-delimited image URLs for the variation gallery (the per-variation multi-image gallery set that swaps on the storefront when a shopper selects this variation). This column does not exist in any other WooCommerce importer template.bossy_custom_enabled— yes/no, enables the customer personalization input field on this productbossy_custom_required— yes/no, makes the personalization input required before Add to Cartbossy_custom_label— the label shown above the input field on the product page (e.g., "Name to engrave")bossy_custom_placeholder— the hint text inside the empty input field (e.g., "First name only, 12 characters max")
type, name, and either sku or the Generate missing SKUs option enabled.5.3 Step 2: Column mapping
Once Bossy reads your CSV, the Step 2 card opens. This is where you tell Bossy which CSV column corresponds to which destination field in WooCommerce.
The mapping screen has a sticky toolbar across the top with controls, and a mapping table below it that lists each CSV column and lets you pick a destination from a dropdown.
The mapping toolbar
Filter columns search. Type to filter the list of CSV columns. Useful when your CSV has 60+ columns.
Show unmapped only checkbox. Hides columns you have already mapped, leaving only the ones still needing your attention.
Four auto-map buttons:
- Auto-map detected — uses the source profile Bossy detected from the file (Etsy, Shopify, or Generic). This is the button that handles Shopify exports — there is no separate "Auto-map Shopify" button because detection does the work. Smart default for most cases.
- Auto-map — applies generic mapping rules. Matches columns named "title", "sku", "price", "stock", and other standard names to the obvious destinations.
- Auto-map Etsy — built specifically for Etsy CSV exports. Maps Etsy's proprietary column names ("Title", "Description", "Price", "Quantity", "Tags", "Materials", "Section", "Sale Price", etc.) to WooCommerce fields correctly.
- Clear mappings — resets the mapping table. Use this when you started with the wrong preset and want to start fresh.
SKU options:
- Generate missing SKUs checkbox — for rows in the CSV that have empty SKU columns, Bossy generates a sequential SKU using the prefix you specify. Highly recommended for new product imports.
- SKU prefix field — the prefix for any generated SKUs. Defaults to
BOSSY, which is the safe default on purpose: no real WooCommerce store usesBOSSY-0001as an SKU pattern, so it is extremely unlikely to collide with existing SKUs in your store. Leave it asBOSSYif you want a safe fallback, or change it to something specific to your shop (initials, brand abbreviation, category code). Either choice works — the default is defensive, not a placeholder. - Force overwrite generated SKU checkbox — when checked, Bossy overwrites EVERY SKU in the import with a generated one, ignoring whatever was in the CSV. Use this when your source data has untrustworthy SKUs (duplicates, weird formats, conflicts with existing WooCommerce SKUs).
Match existing by — a dropdown with four options: Auto (smart), Title, SKU, and Listing ID. This tells Bossy which identifier to trust when deciding whether an incoming row should update an existing product or create a new one. Auto (smart) is the default and tries the strongest available identifier first (see 5.11 for the full priority order). Set it explicitly to Title when your CSV has no SKU or listing ID column at all — a title-only export from a source that does not track SKUs, for example. Before this control existed, a title-only CSV would create a duplicate product on every re-import; forcing the match key to Title fixes that for any product type, not just variable parents.
Run Import button — disabled until you have at least the minimum required mappings in place. Once enabled, click to start the actual import.
Resume image sync button — hidden by default. Appears when a previous import was interrupted mid-image-download. Click it to pick up where it left off without re-importing the product data.
The source profile and health indicators
Below the toolbar, two information bars give you feedback:
- Source profile — what Bossy detected about your CSV, shown as Etsy, Shopify, or Generic. Detection scores your column names (Etsy-style vs Shopify-style vs neither) and labels the file accordingly, so you know which auto-map button to reach for.
- Mapping health — current state of your mapping. Shows warnings like "No SKU column mapped" or "Title column missing" that would cause the import to fail or behave badly.
The mapping table
A two-column table. Left column is the CSV column name as it appeared in your file. Right column is a dropdown of every Bossy destination field. Leave the dropdown unset to ignore that CSV column entirely (useful for columns full of data you do not need to import).
5.4 Step 3: Preview and run
Once your mapping is solid enough for Bossy's Run Import button to enable, the Step 3 card shows a preview of the first several rows from your CSV with the destination fields filled in based on your mapping.
Scan this preview. Look for:
- Prices that came in with a currency symbol prefix and should be plain numbers
- Titles with leftover Etsy-style suffixes you forgot to clean
- Categories that came in as a single string instead of comma-separated
- Descriptions with stray HTML you do not want
- SKUs that look duplicated or malformed
If anything looks wrong, go back up to the Step 2 mapping and adjust. Re-preview. Repeat until the preview rows match what you want WooCommerce to see.
When the preview looks right, click Run Import in the sticky toolbar at the top.
5.5 What happens during import
Bossy processes the import in three phases:
- Phase 1: Product creation. Each row becomes a WooCommerce product. Bossy creates the product, assigns SKU, sets title, price, stock, descriptions, categories, tags, and other mapped fields.
- Phase 2: Image attachment. Image URLs from the CSV are downloaded and attached to the appropriate products. This is the slowest phase by far — image downloads depend on the source server's response time and your server's connection.
- Phase 3: Cleanup and finalization. Bossy commits transients, clears caches, and marks the import as complete.
5.6 SKU handling: the most important section in this chapter
SKUs are the single biggest source of import failures. WooCommerce requires that every product has a unique SKU. If your CSV has duplicate SKUs, or SKUs that conflict with products already in your WooCommerce store, those rows will not import.
Bossy gives you three strategies for handling SKUs:
Strategy A: Use the SKUs in your CSV as-is
Map the SKU column normally. Leave "Generate missing SKUs" UNCHECKED. Leave "Force overwrite generated SKU" UNCHECKED. Bossy will use whatever is in the CSV. Rows with empty SKUs will fail. Rows with duplicate SKUs will fail.
When to use: when your source data is clean and you have already validated SKU uniqueness.
Strategy B: Fill in only the missing SKUs
Map the SKU column. Check Generate missing SKUs. Set a meaningful SKU prefix. Leave "Force overwrite generated SKU" UNCHECKED.
Bossy uses CSV SKUs where they exist and generates sequential SKUs (PREFIX-0001, PREFIX-0002, etc.) for rows where the SKU column is empty.
When to use: when most of your CSV has good SKUs but some rows are blank — common in CSVs assembled from multiple sources.
Strategy C: Generate everything, ignore CSV SKUs entirely
Check both Generate missing SKUs AND Force overwrite generated SKU. Set a meaningful SKU prefix.
Bossy ignores whatever was in the SKU column of your CSV and generates fresh sequential SKUs for every row.
When to use: when your source data has duplicate SKUs, garbage SKUs, or SKUs from a different platform that have no meaning in WooCommerce (Etsy listing IDs, Shopify variant IDs, etc.).
5.7 Common import workflows
Three common import paths, each with a different starting point. Pick the one that matches your situation.
Workflow A: Fresh catalog from the Bossy template
Best for: new WooCommerce stores, clean rebuilds, and anyone who has their product data in Excel or Google Sheets and wants to import it cleanly without wrestling with column mapping.
- Click Download Bossy template on the Import tab.
- Open the template in Excel or Google Sheets.
- Add your products below the examples. Delete the example rows when done.
- For variable products: add one row with type=variable for the parent, then one row with type=variation for each variant, using parent_sku to link them.
- For variation galleries: fill the
bossy_var_gallerycolumn with pipe-delimited image URLs. These become the per-variation gallery that swaps on the storefront when a shopper selects that variant. - For personalization: fill
bossy_custom_enabled,bossy_custom_label, andbossy_custom_placeholderon any product that needs a custom input field. - Save as CSV. Upload to Bossy Import tab.
- Click Read CSV. Bossy maps the template columns automatically — no manual mapping needed.
- Review the preview. Click Run Import.
Workflow B: Etsy migration (using the free SKU Fixer)
If you are moving an Etsy shop into WooCommerce, this is the workflow for it. The free Etsy SKU Fixer plus the Bossy CSV Import give you a clean migration path.
Full Etsy → WooCommerce migration workflow:
- Export your shop data from Etsy. Go to your Etsy shop dashboard → Settings → Options → Download Data. Choose "Currently for sale listings" CSV. Download.
- Go to bossyplugins.com/tools and click the Etsy SKU Fixer card.
- Upload your Etsy CSV. Set your SKU prefix (something short and meaningful — your shop initials work well, like
SSCfor "She's So Crafty"). Set digit width (4 is standard — gives you up to 9999 products). Set starting number (1 unless you have a reason to start higher). Download the updated CSV. - Switch to your WordPress admin. Open Bossy → Import tab.
- Upload the SKU-cleaned CSV. Click Read CSV.
- In Step 2 mapping, click Auto-map Etsy. Bossy maps every Etsy column automatically.
- Review the mapping. Adjust any columns that auto-map missed.
- Since SKUs are now clean from the Fixer step, you can leave both SKU generation options UNCHECKED. The SKUs in your CSV will be used.
- Check the preview in Step 3. Confirm the image columns mapped correctly (you will see up to 10 image URLs per row — that is the Etsy CSV limit, not a Bossy limit).
- Click Run Import.
- Watch the progress. Image download is the slowest phase — Etsy hosts your photos on their CDN and they download at Etsy CDN speed.
- After import completes, run WooCommerce → Status → Tools → Regenerate Shop Thumbnails to generate scaled image sizes.
- If any of your products had more than 10 photos on Etsy, manually download images 11-20 from those listings and add them via the Media Manager tab (Chapter 4).
- Switch to the Bulk Editor tab to review the imported products, fix anything that looks off, and start refining titles/descriptions for WooCommerce SEO instead of Etsy SEO.
A dedicated Etsy importer is in development
We are actively exploring a dedicated Etsy importer that uses the Etsy API directly instead of relying on the CSV export. The benefits would include:
- All 20 images per listing — bypasses the CSV's 10-image cap by pulling directly from your shop
- Cleaner attribute and variation data — Etsy's API returns structured variation data, where the CSV flattens it
- Real-time refresh — re-sync products to pick up Etsy-side edits without re-exporting
- Smarter image matching — fewer broken image links from CDN URL expiration
No release date is committed yet. The CSV-based workflow above remains the supported migration path until the API integration is publicly available. If you want to be notified when the API importer launches, sign up for early access at bossyplugins.com.
Workflow C: Generic CSV from any source
Best for: supplier feeds, ERP exports, platform migrations from sources other than Etsy or Shopify, developer-built data exports, or any CSV where you have control over the column structure.
- Upload your CSV to the Import tab. Click Read CSV.
- Bossy detects the column names and opens the Step 2 mapping table.
- If your columns look like standard WooCommerce field names, click Auto-map to try automatic mapping. Review what it mapped.
- For columns that auto-map missed or mapped incorrectly, use the dropdown next to each column name to pick the correct destination field.
- When the mapping looks right, name it and click Save preset. Next time you import data from this source, load the preset and skip mapping entirely.
- Click Run Import.
If your source data has wildly different column names than any WooCommerce standard (a legacy system that calls products "Items" and prices "Unit Cost"), consider remapping the columns in Excel or Sheets to match the Bossy template before importing. A 10-minute rename in Excel or Sheets before import is faster than wrestling with mapping for every column.
5.8 Image handling details
Image handling is the most complicated part of importing. A few specific behaviors to know about:
Bossy downloads remote images to your media library. Your CSV provides image URLs (typically). Bossy fetches each one and uploads it as an attachment in your WordPress media library, then links it to the product.
Fast mode skips thumbnail regeneration. As covered above, scaled image sizes (thumbnail, medium, large) are NOT generated during import. Run the Regenerate Shop Thumbnails tool after.
Failed image downloads do not fail the product. If an image URL is broken or the remote server is down, that single image is skipped but the product still imports. You will see this in the import results card and can re-attach the image manually later.
Resume image sync recovers interrupted image phases. If your import stopped during the image phase (browser closed, network dropped, etc.), the Resume image sync button in the sticky toolbar will reappear so you can finish the image downloads without re-creating products.
Multiple images per row use a delimiter. Most CSVs put multiple image URLs in one cell separated by | or , or some other delimiter. The Auto-map presets understand the standard formats. Manual mapping may require you to verify your delimiter matches what Bossy expects.
5.9 Import performance benchmarks
Bossy's CSV importer has been load-tested on destructive imports (full catalog wipe then re-import) on standard shared hosting. These are real numbers, not theoretical estimates:
- 200 products → ~0.80 min · Product success: 100%
- 2,000 products → ~7.22 min · Product success: 100%
- 5,000 products → ~20.56 min · Product success: 100%
- 10,000 products → ~53.33 min · Product success: 100% · Image success: 99.94%
Reading these numbers:
- Product success rate is 100% across all catalog sizes tested. Every product row imported correctly. The importer's core job — creating and updating WooCommerce product records — is reliable at scale.
- Image success rate at 10,000 products was 99.94%. The ~0.06% of images that failed were not product failures — the products came in cleanly without their images. Causes are almost always server-side: CDN timeouts, expired image URLs, format mismatches. These are recoverable via Resume image sync without re-importing any product data.
- Timing scales approximately linearly. The relationship between product count and import time is predictable — no exponential blowup at larger catalog sizes.
- These tests were run on shared hosting — the same tier most Bossy customers use. Performance on VPS, managed WordPress hosting, or cloud infrastructure will be faster.
What this means for your import:
- Typical Etsy shop (200 products): under 1 minute
- Mid-size handmade catalog (500-1,000 products): 2-4 minutes
- Large catalog migration (2,000 products): approximately 7 minutes
- Enterprise-scale import (10,000 products): approximately 53 minutes — plan to run this unattended
5.10 Reading the import results
After import finishes, the Import results card appears with a summary:
- How many products were created
- How many products were updated (if SKUs matched existing products)
- How many images were attached successfully
- How many images failed to download (with URLs listed)
- How many rows failed entirely (with reasons — SKU conflict, missing required field, etc.)
Pay attention to the failed rows section. Common failures and fixes:
- "Duplicate SKU" — that SKU is already on another product. Edit your CSV to make the SKU unique, or use Strategy C above.
- "Missing required field" — usually means no title was mapped or the title cell was empty. Check your mapping.
- "Invalid price" — price column has non-numeric characters Bossy could not strip. Clean your CSV and re-import that row.
5.11 Re-importing the same CSV: idempotency and what to expect
A common moment of panic: you finished an import, you are not sure if every row worked, and you wonder whether re-uploading the exact same CSV will create duplicates or just safely update what is already there. The honest answer depends entirely on your SKUs.
What happens when you re-import the same file
Bossy does not remember files. It does not keep a hash or history of CSVs you have previously uploaded. Each import is a fresh run from Bossy's perspective.
BUT — Bossy DOES remember your products. On every row of every import, Bossy attempts to match the row against existing products in your store using these identifiers in order:
id(WooCommerce product or variation ID, if mapped)- Source key (an internal identifier some platforms include)
listing_id(for Etsy-style data)sku- Row identity key (a composite Bossy builds from your mapping)
- Name/title fallback (last resort in Auto mode)
If Bossy finds a match using any of those keys, it UPDATES that existing record instead of creating a new one. If no match is found, it creates a new product or variation.
That priority order is what runs when Match existing by (section 5.3) is left on Auto (smart). Setting it to Title, SKU, or Listing ID instead skips the automatic priority order and forces Bossy to match on that one identifier only — the fix to reach for when your CSV has no SKU or listing ID at all and Auto's fallback isn't matching the way you expect.
The practical translation: for a CSV with clean, stable, unique SKUs on every row, re-uploading the same file is effectively idempotent. You will get mostly updates with few or no duplicates. The first run created the products. The second run updates the same products with the same data. The third run does the same. No harm done.
When re-import is safe
- Every product row has an SKU that is unique and matches an existing product's SKU in your store
- Every variation row has an SKU that is unique and matches an existing variation's SKU
- You used a consistent SKU scheme (sequential, predictable, no random regeneration between runs)
- You did not change SKU values between the first and second import
In this scenario, re-import is your safety net. Did the import die halfway through? Re-run it. Bossy updates rows it already created and creates the rows it missed. Clean recovery.
How updates work at the field level (mapped vs unmapped columns)
Once Bossy matches an incoming row to an existing product, it walks through your column mapping and updates each mapped field with the CSV value. Fields you did NOT map are left exactly as they are in WooCommerce — Bossy does not touch them.
In practice:
- Map
name→ product title gets overwritten with the CSV value - Map
description→ long description gets overwritten with the CSV value - Map
short_description→ short description gets overwritten with the CSV value - Map
regular_price→ price gets overwritten with the CSV value - Map any field → that field becomes authoritative from the CSV on this run
- Do NOT map a field → that field keeps whatever it had in WooCommerce, untouched
This is the engine behind partial updates. Want to do a bulk price refresh from a supplier feed without disturbing your hand-edited titles? Build a CSV with just the SKU column and the price column. Map only those two. The titles, descriptions, images, and everything else stay exactly as you have them in WooCommerce.
When re-import will create duplicates
- Your CSV has missing SKUs and you have "Generate missing SKUs" checked — Bossy generates FRESH sequential SKUs on each run, which means the second run creates new products with new SKUs instead of updating the first run's products
- Your SKUs are inconsistent between runs (different formats, different prefixes, or you changed them between exports)
- Your products were created by Bossy in run 1 with auto-generated SKUs, and your run 2 CSV does not have those exact same SKUs
- You used "Force overwrite generated SKU" with no source SKU column — every run produces a new set of SKUs
The "I edited my Etsy listings between exports" trap
Here is the scenario that wrecks more imports than any other, told straight: you imported your shop on Monday. Throughout the week, you kept selling on Etsy and editing your Etsy listings — fixing typos in titles, tweaking SKUs, swapping main photos, changing variation attribute names. On Friday, you export your Etsy CSV again and re-import it into WooCommerce thinking it will "catch the new stuff."
Two different outcomes here, depending on what you edited:
If you ONLY changed non-matching fields (titles, descriptions, prices, photos) and SKUs/IDs stayed stable:
- Bossy still matches those rows to your existing WooCommerce products by SKU
- Bossy treats the new CSV values as authoritative and OVERWRITES your existing WooCommerce data with the new Etsy data
- If you had already cleaned up titles or rewritten descriptions in WooCommerce, those changes get wiped
- No duplicates, but no preservation of your WooCommerce work either
If you changed the matching keys themselves (SKUs renamed, listing IDs changed) on Etsy:
- Bossy cannot match the rows to your existing products
- Bossy creates NEW products with the new data
- You now have duplicates — the old version from Monday's import, and the new version from Friday's
Either way, re-importing the full CSV after editing on the source platform is a bad idea. You either lose your WooCommerce edits OR you create duplicates. Neither is what you wanted when you clicked Run Import.
This is not a Bossy bug. Every CSV importer in existence has this problem. WooCommerce native, Shopify, BigCommerce, all of them. There is no magic way to safely round-trip product data through CSV when both sides keep editing — you need a real sync product for that.
The clean advice for anyone re-importing from a source they are still editing on:
- Verify your first import landed correctly. Open the Bulk Editor, scan your products, and fix any rows that did not come in properly (use the Bulk Editor for in-place edits — DO NOT re-import individual rows).
- Once your initial import is clean, treat your WooCommerce store as the source of truth for those products. Do your edits in WooCommerce, not on the source platform, or you will overwrite WooCommerce work the next time you re-import.
- If you DO need to re-import — for new products you added on the source platform — cull your CSV down to only the new items first. Open the CSV in Excel or Google Sheets, delete every row that already exists in WooCommerce, save, then import only the new rows.
- Never re-import the full CSV expecting Bossy to "update what changed." It will update mapped fields on every matched row using the CSV values — overwriting any WooCommerce edits you made — and create new products for any rows whose matching keys changed.
What Bossy is NOT doing behind the scenes
Two specific things Bossy does not do that customers sometimes assume it does:
- Bossy does not hash files or track CSV history. There is no "this file was already imported, are you sure?" prompt. You can re-upload the same CSV ten times and Bossy will run it ten times.
- Bossy does not preserve in-run duplicate guards across runs. During a single import, Bossy uses transients (short-lived database entries) to catch duplicate SKUs WITHIN that run. When a new run starts, those transients are reset. The guards do not persist between imports.
Practical re-import scenarios
Scenario A: import died halfway through, want to finish it
Re-upload the same CSV. With stable SKUs, Bossy will update the products it already created (no harm) and create the rows it missed. Done.
Scenario B: supplier sent an updated price list
Build a CSV with the same SKUs as your products and the new prices. Re-import. Bossy matches by SKU and updates prices in place.
Scenario C: re-running an import after a stock refresh
Same SKUs, new stock numbers. Re-import. Bossy updates the stock fields on matching products. Fast catalog refresh.
Scenario D: not sure if my SKUs are stable
Stop. Do not re-import. Verify your SKUs first by checking a few products in the Bulk Editor and comparing to your CSV. If they match exactly, re-import is safe. If they do not, either rebuild your CSV with the correct SKUs or use the Bulk Editor to make in-place corrections instead.
5.12 Common workflows
Workflow 1: Importing a small batch of new products (10-50 items)
- Build your CSV from your product data in Excel or Google Sheets. Include columns for title, SKU, price, stock, short description, long description, categories, tags, image URLs.
- Open Bossy → Import. Upload, Read CSV.
- Click Auto-map (the generic one). Adjust any unmapped columns manually.
- Leave "Generate missing SKUs" unchecked since your SKUs are clean.
- Run Import. Watch results.
- After completion, run Regenerate Shop Thumbnails.
Workflow 2: Re-importing to update existing products
See section 5.10 "Re-importing the same CSV" for the full breakdown. Short version: with stable, unique SKUs across runs, Bossy updates matching products in place instead of duplicating. Use this for bulk price refreshes from a supplier feed, stock updates, or recovering from a partial import that died mid-run.
Workflow 3: Migrating from Etsy (full walkthrough in section 5.7)
See section 5.7 for the complete Etsy migration sequence using the free SKU Fixer tool.
Workflow 4: Importing from a supplier feed with messy SKUs
- Save the supplier feed as a CSV.
- Upload to Bossy. Run Read CSV.
- Use Auto-map or map manually.
- Check Generate missing SKUs AND Force overwrite generated SKU. Set your prefix.
- Bossy will ignore the supplier's SKUs entirely and generate clean sequential SKUs for your shop.
- Run import.
5.13 Things that catch people off guard
Auto-map Etsy is not the same as Auto-map. Run Auto-map Etsy on a non-Etsy CSV and you will get mostly empty mappings because Etsy's column names are specific. Use the generic Auto-map for non-Etsy data.
Mapping presets save mapping, not file content. A preset remembers "column 1 maps to title, column 2 maps to SKU" etc. If your next CSV has columns in a different order, the preset will map the wrong things. Verify after loading a preset.
Categories must already exist in WooCommerce. Bossy creates products inside categories but does not create categories from CSV data. If your CSV references "Vintage Jewelry" and that category does not exist in your shop yet, the product imports without a category. Create your categories first.
Variable products and variations ARE supported. Bossy can import simple products, variable products with their variations, or a mix in the same CSV. The trick to clean variation imports is SKU planning — covered in detail in the new section 5.12 below.
The Etsy CSV is capped at 10 image URLs per listing. Repeated from section 5.7 because it bites people: if your Etsy listings have more than 10 photos, the CSV export only gives you the first 10. The other photos must be added manually after import, or you can wait for the dedicated Etsy API importer in development.
5.14 Importing variations: SKUs are the key
Variation imports are one of Bossy's strongest features, but they are also the place where messy SKU planning causes the most pain. WooCommerce represents a variable product as one parent record with multiple child variation records. Your CSV needs to tell Bossy which rows are parents and which rows are variations belonging to which parent. Bossy supports four resolution methods for linking variations to parents, applied in priority order — explained in detail below in section 5.14.6. The three most common patterns are covered first.
CSV pattern 1: parent_sku column (recommended)
The cleanest, most explicit method. Your CSV has a parent_sku column. For every variation row, fill in the SKU of its parent product. For the parent row itself, leave parent_sku empty.
Example CSV layout:
- Row 1:
sku=HOODIE-001,parent_sku=(empty) → this is the parent variable product - Row 2:
sku=HOODIE-001-RED-S,parent_sku=HOODIE-001→ variation belonging to row 1 - Row 3:
sku=HOODIE-001-RED-M,parent_sku=HOODIE-001→ variation belonging to row 1 - Row 4:
sku=HOODIE-001-BLUE-S,parent_sku=HOODIE-001→ variation belonging to row 1
Bossy reads the parent_sku value on each variation row, finds the parent (either in the same import batch or already in your WooCommerce store), and attaches the variation. No guessing involved. If the named parent does not exist anywhere, Bossy auto-creates it for you (covered below in section 5.14.7).
CSV pattern 2: listing_id grouping (for Etsy and similar)
When you export from a platform like Etsy that uses a single listing ID for all variations of a product, every row for that product shares the same listing_id value but has different variation attributes (size, color, material). Bossy detects this pattern and groups rows automatically: the first row with a given listing_id becomes the parent variable product, and subsequent rows with the matching listing_id become its variations.
You do not need to add a parent_sku column to use this method — Bossy infers parent-child from the shared listing_id alone. This is what makes the Auto-map Etsy preset work cleanly out of the box for Etsy CSVs.
parent_sku AND listing_id filled in, the explicit parent_sku wins. Bossy treats listing_id grouping as the fallback when no parent_sku is provided.CSV pattern 3: just variation SKUs (Bossy figures out the rest)
If you do not include a parent_sku or listing_id column at all, Bossy will still try to derive parent-child relationships from your variation SKUs. If your variation SKUs follow a consistent pattern where the parent SKU is the prefix (e.g., variations HOODIE-001-RED-S, HOODIE-001-RED-M derive parent HOODIE-001), Bossy can pick that up. This is the least reliable pattern — better to add a parent_sku column whenever you can — but it works for cases where adding columns is not an option.
Why pre-generating SKUs saves you a step
For variation imports, the rows in your CSV need to identify each other. Variations need to point to their parent. Parents need to be identifiable from a position in the file. The cleanest path is to assign SKUs BEFORE you import, not let Bossy generate them at import time.
Pre-generating SKUs has three concrete benefits:
- You control parent-child linking. Once SKUs are in place, you can fill in the
parent_skucolumn on every variation row, making the relationship explicit. Bossy does not have to guess. - You catch SKU collisions before import. If you build your SKUs in Excel or Google Sheets first, duplicates are visible and fixable. Catch them during import and you have a partial import to clean up.
- Faster imports. Bossy does not have to allocate generated SKUs row-by-row during the import — the file is already complete.
Three ways to pre-generate SKUs before import:
- Use the free Etsy SKU Fixer at bossyplugins.com/tools. Best for Etsy CSVs. Sets the prefix, digit width, and starting number, then writes sequential SKUs to your file. Covered in section 5.7.
- Generate in Excel. Use the formula
="PREFIX-"&TEXT(ROW()-1, "0000")in your SKU column to generatePREFIX-0001,PREFIX-0002, etc. Drag down. Copy-paste as values. Done. - Generate in Google Sheets. Same formula works:
="PREFIX-"&TEXT(ROW()-1, "0000"). Drag down. Use Edit → Paste special → Values only to lock the values before exporting.
HOODIE-001, variations = HOODIE-001-RED-S, HOODIE-001-RED-M, etc. This makes the parent_sku column trivial to fill in (just strip the variation suffix) and makes your data much easier to scan when something goes wrong later.Variation import workflow
- Plan your SKU scheme. Decide the parent SKU pattern and how variations will be named.
- Build the CSV in Excel or Google Sheets. Use formulas to pre-generate SKUs for both parents and variations.
- Add a
parent_skucolumn. Fill it on every variation row with the matching parent SKU. Leave it empty on parent rows. - Add attribute columns (e.g.,
attribute:Size,attribute:Color). Fill these in for variation rows so Bossy knows what makes each variation unique. - Export from Excel or Sheets as CSV.
- Open Bossy → Import. Upload, Read CSV.
- Map columns. Make sure
parent_skuis mapped and the attribute columns are mapped. - In the SKU options, leave Generate missing SKUs UNCHECKED since your SKUs are already in the file.
- Preview. Verify variations appear nested under their parent rows.
- Run Import.
How Bossy resolves the parent for a variation row
When Bossy processes a row identified as a variation, it walks through four resolution methods in priority order. The first one that finds a parent wins. Knowing this order helps you decide which columns to put in your CSV.
parent_idcolumn. If the variation row has an explicitparent_idvalue pointing to a valid existing product, that product is used as the parent. Fastest, most explicit, no lookups needed.parent_sku/parentcolumn. Ifparent_idis not set or invalid, Bossy looks forparent_sku(or a column namedparent). It then finds the product with that SKU — either in the same import batch or already in your WooCommerce store — and attaches the variation.listing_idlinkage. If neitherparent_idnorparent_skuis present, Bossy tries to resolve a parent from thelisting_idcolumn. This is the path used by Etsy CSVs where rows are grouped by listing ID without an explicit parent pointer.- SKU pattern derivation. Last resort. Bossy attempts to derive the parent SKU by stripping the variation suffix off the variation SKU (e.g., variation
HOODIE-001-RED-S→ derived parentHOODIE-001). Then it looks for that parent in the batch or in your store.
If all four methods fail and Bossy cannot derive any parent for a variation row, that row fails with the error:
Variation row missing valid parent product (parent_sku or id).
Watch for that exact message in the import results card and fix the CSV before re-importing — usually by adding a parent_sku column or filling in missing values.
Auto-creating parents when no parent row exists
Here is where Bossy is genuinely smarter than most CSV importers: if a variation row points to a parent_sku that does not exist anywhere — not in the import batch, not in your WooCommerce store — Bossy creates the parent for you on the fly.
The auto-created parent gets these defaults:
- Type:
variable - SKU: the
parent_skuvalue from the variation row - Name (title): derived from the SKU, with hyphens and underscores converted to spaces. So
parent_sku=HOODIE-001becomes title "HOODIE 001". Functional but not pretty — you will want to clean this up in the Bulk Editor after import. - Status:
publish
Then Bossy attaches the variation to the new parent. The result: a working variable product with the variations you imported, ready to be tidied up in the Bulk Editor.
Same auto-create behavior applies for the listing_id path. If parent_sku is missing but listing_id is present, Bossy tries to look up an existing product whose normalized SKU matches the listing ID. If found, it reuses that parent. If not, it generates a unique parent SKU from the listing ID and proceeds to auto-create.
parent_sku (or listing_id), Bossy figures out the rest. But — and this is a real but — including explicit parent rows means you control the title, status, descriptions, and category of the parent product. Auto-created parents are barebones. The cleaner your file, the cleaner your import.Simple-to-variable coercion
A specific behavior worth knowing about: if Bossy finds an existing product matching your parent_sku, but that existing product is a SIMPLE product (not variable), Bossy will convert it to a variable product before attaching the variations.
In other words: you can use CSV import to take a simple product you already have in WooCommerce and turn it into a variable product by importing variations that point to it. Bossy will not create a duplicate, refuse the import, or leave you with a broken split-parent tree. It coerces the existing simple product to variable in place.
Chapter 5 recap
- CSV Import is Pro only. Three-step flow: upload, map, import.
- Three entry points: (A) Bossy template — download, fill in Excel/Sheets, import with no mapping required; (B) platform migration — Bossy auto-detects Etsy and Shopify exports and Auto-map detected translates the columns; (C) bring your own CSV — map manually, save preset, reuse.
- The Bossy template is the only import format that covers variation galleries (
bossy_var_gallery) and personalization fields (bossy_custom_enabled,bossy_custom_label, etc.). 58 columns, three example rows, no mapping step needed. - Mapping presets save serious time. Save one after every successful import from a non-template source.
- Four mapping buttons: Auto-map detected (uses the detected Etsy/Shopify/Generic profile), Auto-map (generic rules), Auto-map Etsy (Etsy-specific), and Clear mappings. Pick based on your source.
- SKU handling has three strategies. For migrations, use Strategy C: generate everything, ignore source SKUs.
- The default
BOSSYSKU prefix is the safe default on purpose — no real store uses BOSSY-0001 as their pattern, so collisions are unlikely. Change it for your shop, or leave it for the safe path. - Already imported and want pretty SKUs? Use the in-plugin Bulk SKUs panel in the Bulk Editor (Chapter 2.6) to rewrite SKUs in-place. Different tool, same SKU problem, depending on whether you are pre-import or post-import.
- Variations ARE supported. Bossy resolves variation parents in priority order:
parent_id→parent_sku→listing_id→ SKU pattern derivation. - Bossy auto-creates parents when variations point to a SKU that does not exist yet — minimal data, status
publish, ready to clean up in the Bulk Editor. - Simple-to-variable coercion: if you point variation rows at an existing simple product's SKU, Bossy converts that product to variable instead of duplicating or refusing.
- Re-import is idempotent with stable SKUs. Bossy matches by ID, listing_id, SKU, and row identity keys. Same SKUs = updates in place. Unstable SKUs = duplicates. Bossy does not hash files — it matches on product keys.
- Match existing by (Auto / Title / SKU / Listing ID) lets you force which identifier decides update-vs-create, instead of relying on Auto's built-in priority order. Set it to Title for a CSV with no SKU or listing ID column — fixes the duplicate-on-re-import problem that title-only exports used to hit.
- Mapped fields on a matched row are authoritative — they overwrite WooCommerce values. Unmapped fields are left alone. This enables partial updates (CSV with just SKU + price, map only those, run import for a clean price refresh).
- If you edited titles, SKUs, or photos on Etsy after your first import, re-importing the full CSV will either wipe your WooCommerce edits (if SKUs stayed stable) or create duplicates (if SKUs changed). Verify your first import, fix in WooCommerce going forward, and only re-import a culled CSV of new products.
- Pre-generate SKUs in Excel, Google Sheets, or the free Etsy SKU Fixer to save a step and avoid collisions.
- The Etsy SKU Fixer at bossyplugins.com/tools is the recommended pre-step for Etsy migrations.
- Etsy CSV exports only contain 10 of up to 20 listing images. Plan for this limitation. A dedicated Etsy API importer is in development to fix it.
- After import, run WooCommerce → Status → Tools → Regenerate Shop Thumbnails to generate scaled image sizes.
- Failed image downloads do not fail the product. Resume image sync recovers interrupted image phases.